
1 Introduction
The Portfolio Analysis and Management System (PAMS) allows Department of Energy (DOE), Office of Science (SC) applicants and awardees to access and manage their submissions Submissions and awards Awards in a single system. To create or access PAMS or Grants.gov submissions Submissions (Letters of Intent (LOIs), Pre-ProposalsPreproposals, or Proposals) or to access or request modifications to award Award information, a user must have an external user account.
As a PAMS user, you should never have multiple PAMS accounts, and you should never share your username or password with other users or allow them to access your account.
The purpose of this document is to provide step-by-step instructions for users to follow to create and update an external PAMS account.
2 Prerequisites
Before a user can create an external PAMS account, the following criteria must be met:
- The user has a valid email address
- The user has access to the PAMS Public website , (https://pamspublic.science.energy.gov/webpamsepsexternal/login.aspx)
3 Creating an External Account
Use the following steps to create an external PAMS account.
3.1 Creating an External Account Without a Registration Code
Use the following steps to create an external PAMS account without a registration code.
1. Navigate to the PAMS external homepage at: https://pamspublic.science.energy.gov/webpamsepsexternal/login.aspx
2. Click the Create New PAMS Account link in the navigation menu on the right"I do not have a PAMS Account / I have a Registration Code" button in the User Login section. (Figure 1)
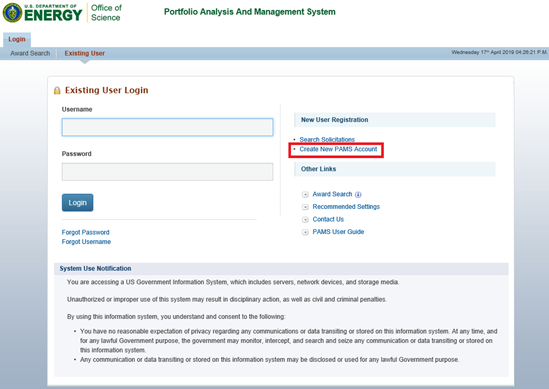
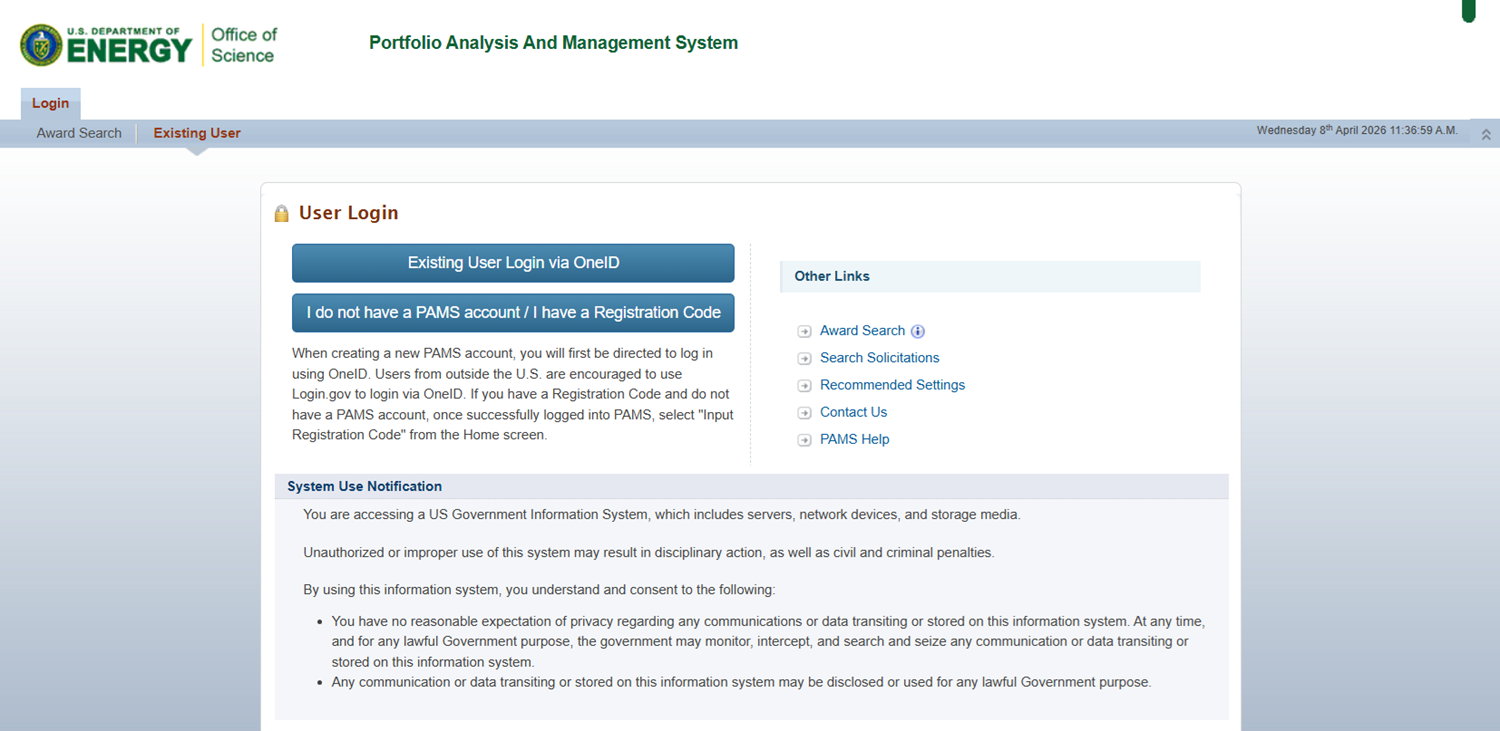
Figure 1. PAMS External Homepage - Create New PAMS Account
| If you received an email inviting you to register to PAMS, skip to section 3.2 Creating an External Account With a Registration Code and follow the instructions in the invitation email. |

3. PAMS will load the Having Trouble Logging In? page, which displays a list of seven subsections that provide further guidance for logging into PAMS. Select No, I have never had an accountnavigate to the OneID Login page. Select the "PIV card" login option and enter your credentials when prompted. (Figure 2)
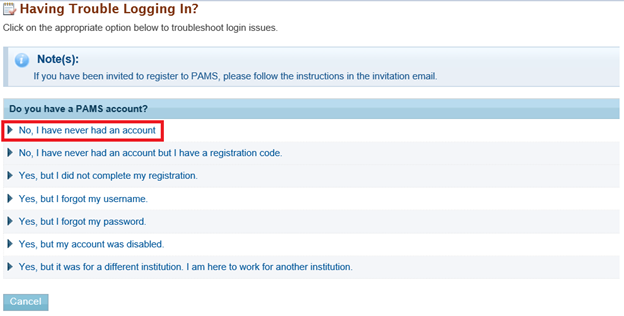
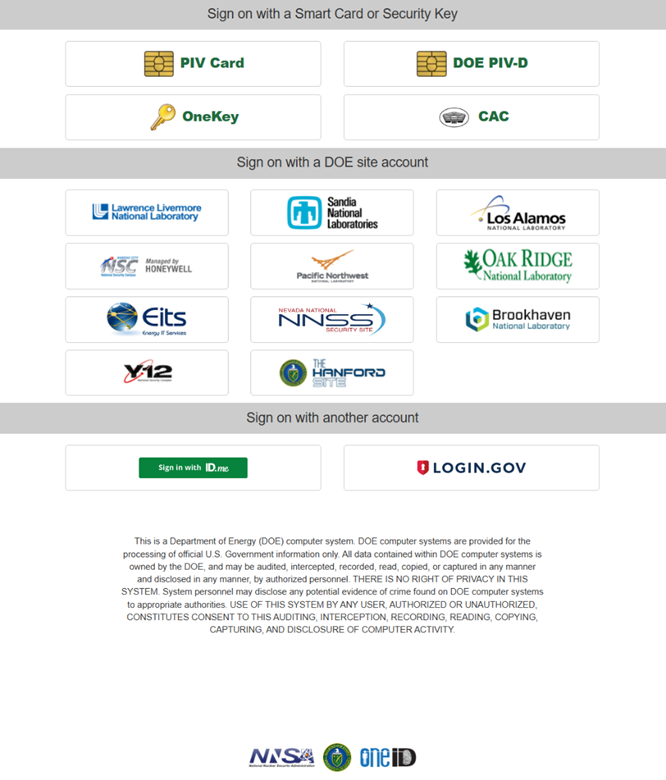
Figure 2. Having Trouble Logging In? – No, I have never had an accountOneID Login
4. Upon clicking No, I have never had an account, successful authentication, PAMS will expand the subheader. Read the section carefully. To create an external account, click Create an Account. To cancel account creation, click Cancel. load the PAMS Account Not Found page, which displays two subsections that provide further guidance for logging into PAMS. Select the "I do not have a PAMS Account / I have a Registration Code" subsection, and then "Create Account" within that subsection. (Figure 3)
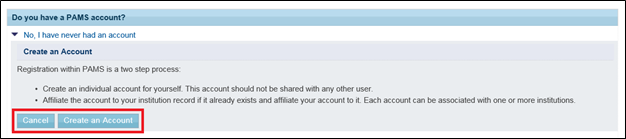
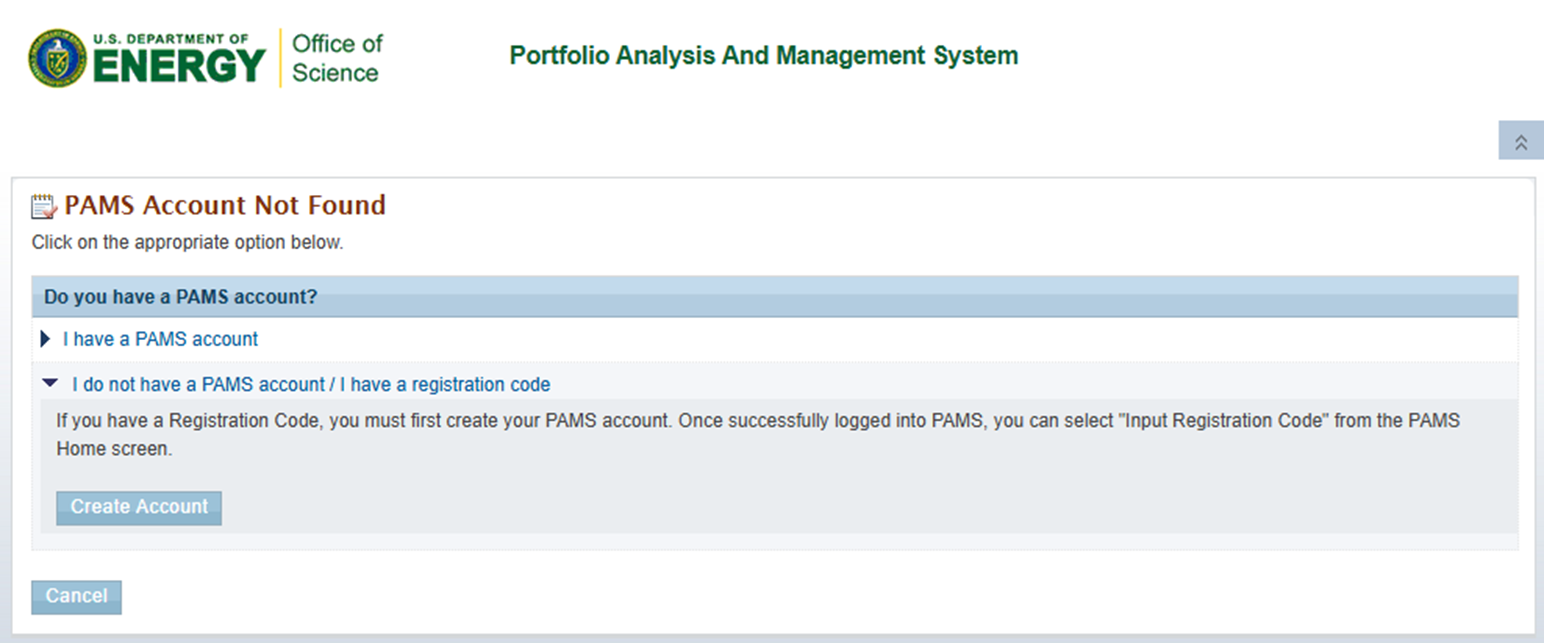
Figure 3. Having Trouble Logging In? – NoPAMS Account Not Found, I have never had an account, Cancel, do not have a PAMS account / I have a registration code – Create Account
5. Upon clicking Create an Account, PAMS will navigate the user to the “Create Account” page. (Figure 4 - 9)
Refer to the table tables below for guidance on completing the required fields. (Figure 4)
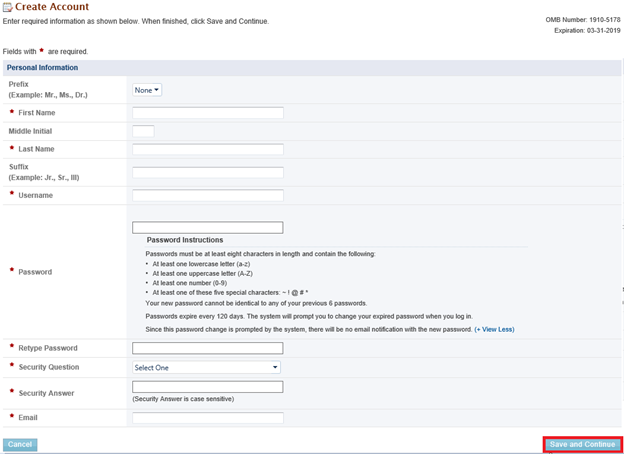
Figure 4. Create Account
Required Fields
...
Element
...
Description
...
First Name
...
Enter your first name.
...
Last Name
...
Enter your last name.
...
Username
...
Enter the username you wish to use. (Do not use spaced when creating your username)
...
Password
...
Enter a password. Passwords must be at least eight characters in length and contain the following:
· At least one lowercase letter (a-z)
· At least one uppercase letter (A-Z)
· At least one number (0-9)
· At least one of these five special characters: ~ ! @ # *
Your new password cannot be identical to any of your previous 6 passwords.
Passwords expire every 120 days. The system will prompt you to change your expired password when you log in.
Since this password change is prompted by the system, there will be no email notification with the new password.
...
Retype Password
...
Retype your password.
...
Security Question
...
Select a security question. Should you forget your password at any time, this security question will allow you to obtain a new password.
...
Security Answer
...
Provide an answer for the security question.
...
...
Enter an email address. This email address must be a unique email and you will not be able to create an account if the email is associated to another PAMS account.
3.1.1 Personal Information
PAMS will prepopulate the Personal Information section with the first and last name returned by the OneID authentication. (Figure 4) All Personal Information fields are editable. Additionally, you can edit your information by navigating to the View/Update Profile page after your account has been created.
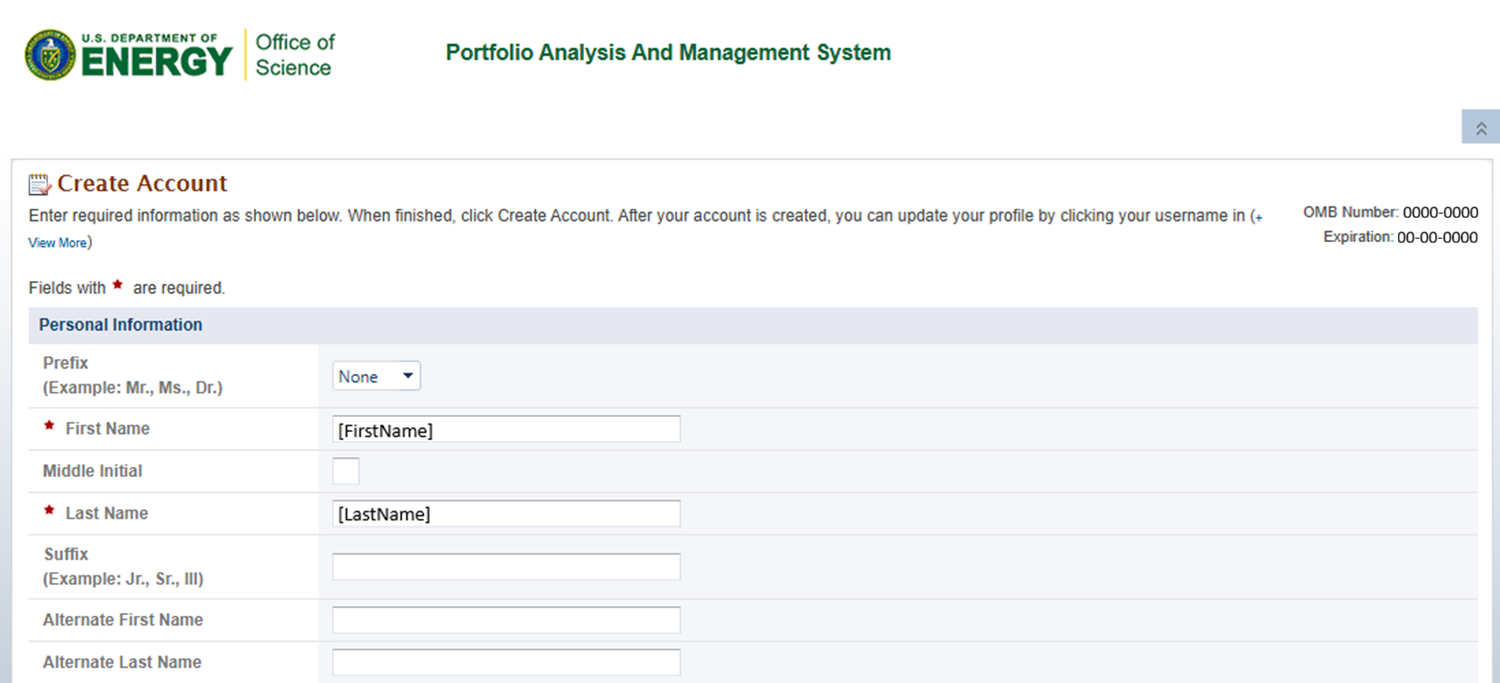
Figure 4. Create Account – Personal Information
3.1.2 Individual Information
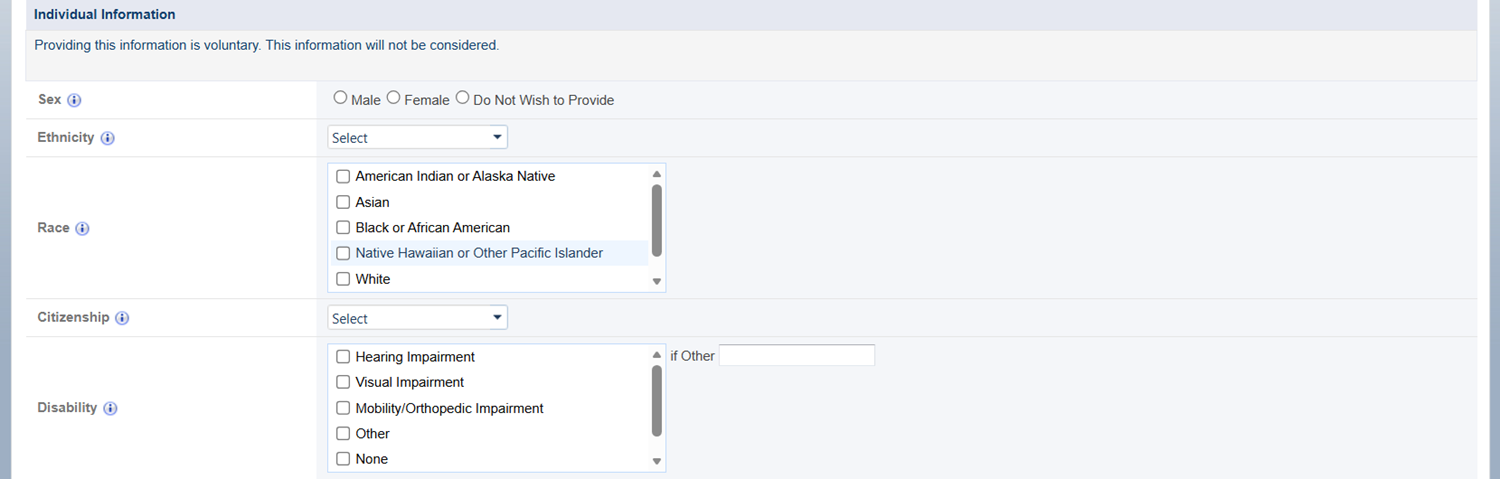
Figure 5. Create Account, Individual Information
Fields
| Element | Description |
|---|---|
Sex |
6. Upon completing the required fields, click Save and Continue in the bottom right corner of the page. (Figure 4)
7. PAMS will load the Create Account page, the Personal Information you provided on the previous page will be populated. Refer to the table below for guidance on completing the remaining required fields. (Figure 5)
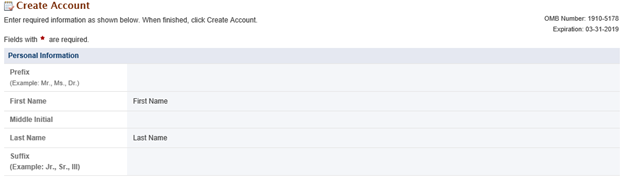
Figure 5. Create Account – Personal Information
Refer to the table below for guidance on completing the Demographic Information section. (Figure 6)
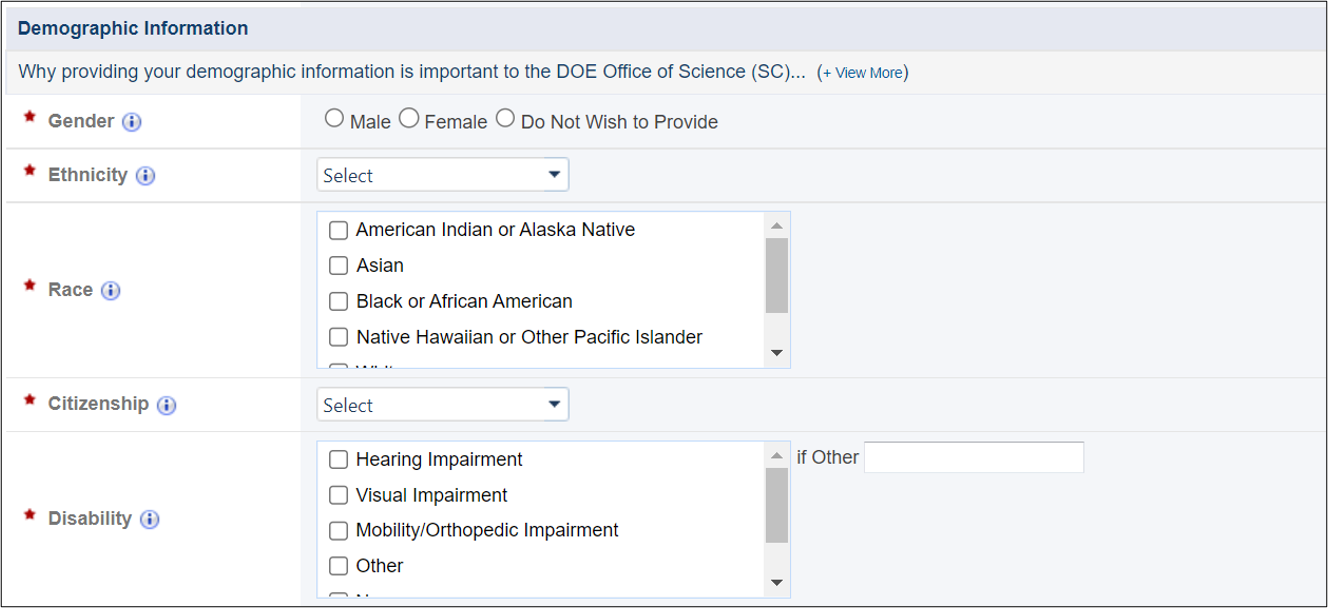
Figure 6. Create Account, Demographics Information
Required Fields
| Element | Description |
|---|---|
Gender | Select "Male", "Female", or "Do Not Wish to Provide" to designate your Gender. |
Ethnicity | Select "Hispanic or Latino", "Not Hispanic or Latino", or "Do Not Wish to Provide" to designate your Ethnicity. |
Race | Select all that apply to designate your Race:
NOTE: You cannot select "Do Not Wish to Provide" with any other selection within the Race selection box. |
Citizenship | Select "U.S. Citizen", "Permanent Resident", "Other Non-US Citizen", or "Do Not Wish to Provide" to designate your Citizenship. |
Disability | Select all that apply to designate any Disability:
NOTE: You cannot select "None" or "Do Not Wish to Provide" with any other selection within the Disability selection box. |
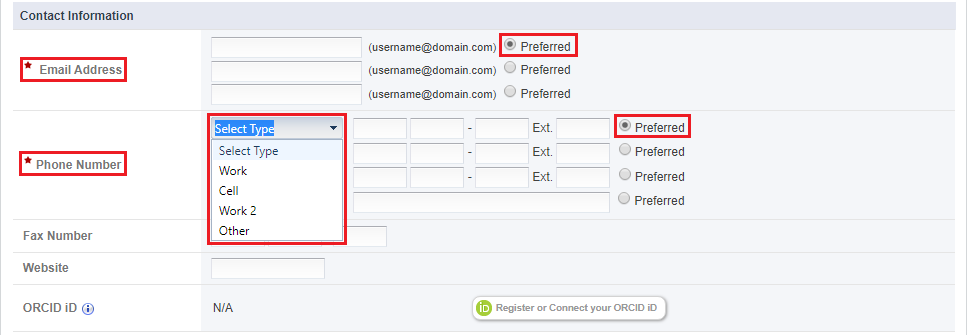
8. Enter your Email Address(es) and identify the Preferred email, see the table on required fields for more information). (Figure 7)
9. Enter your Phone Number and identify the Preferred Phone number, see the table on required fields for more information). (Figure 7)
3.1.3 Contact Information
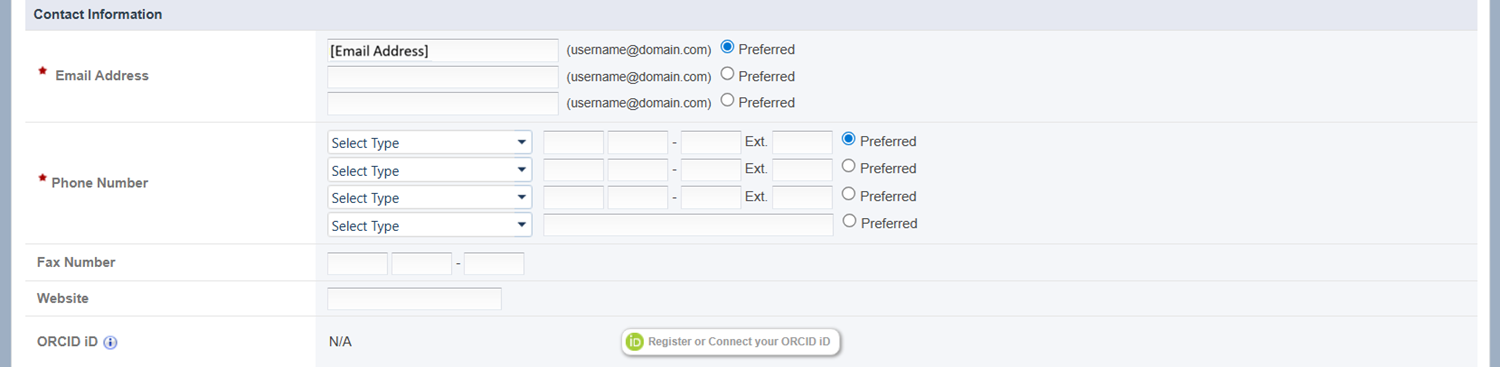
Figure 6Figure 7. Create Account – Contact Information
10. Enter your Mailing Address, designate if it is the Address, PO Box Only, or Rural Route. (Figure 8)
11. Enter your City, State, and Zip Code. (Figure 8)
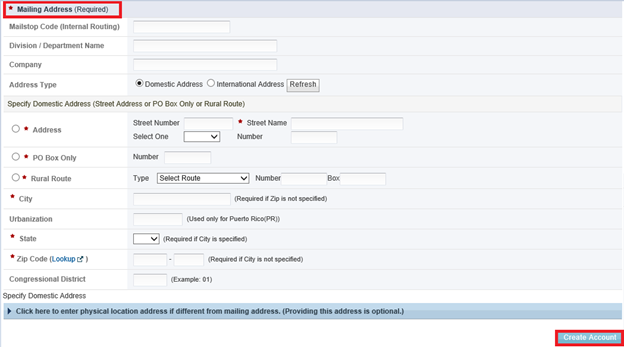
Figure 8. Create Account – Mailing Address
Required Fields
| Element | Description |
|---|---|
| Email Address | Enter an email addressPAMS will prepopulate the Preferred Email Address with the email address associated with the login credential you used on the OneID Login page. You may enter up to two (2) additional email addresses. (Figure 7) |
| Phone Number | Enter a phone number by selecting one of the following options from the Select Type dropdown (Work, Cell, Work 2, Other) and entering the phone number in the subsequent text fields. (Figure 7) You can add up to three (3) domestic phone numbers and one (1) international phone number. International phone numbers must be entered in the fourth “Phone Number” int he fourth "Phone Number" field. NOTE: You must select a preferred phone number by selecting the “Preferred” "Preferred" radio button next to the appropriate phone number. |
3.1.4 Mailing Address
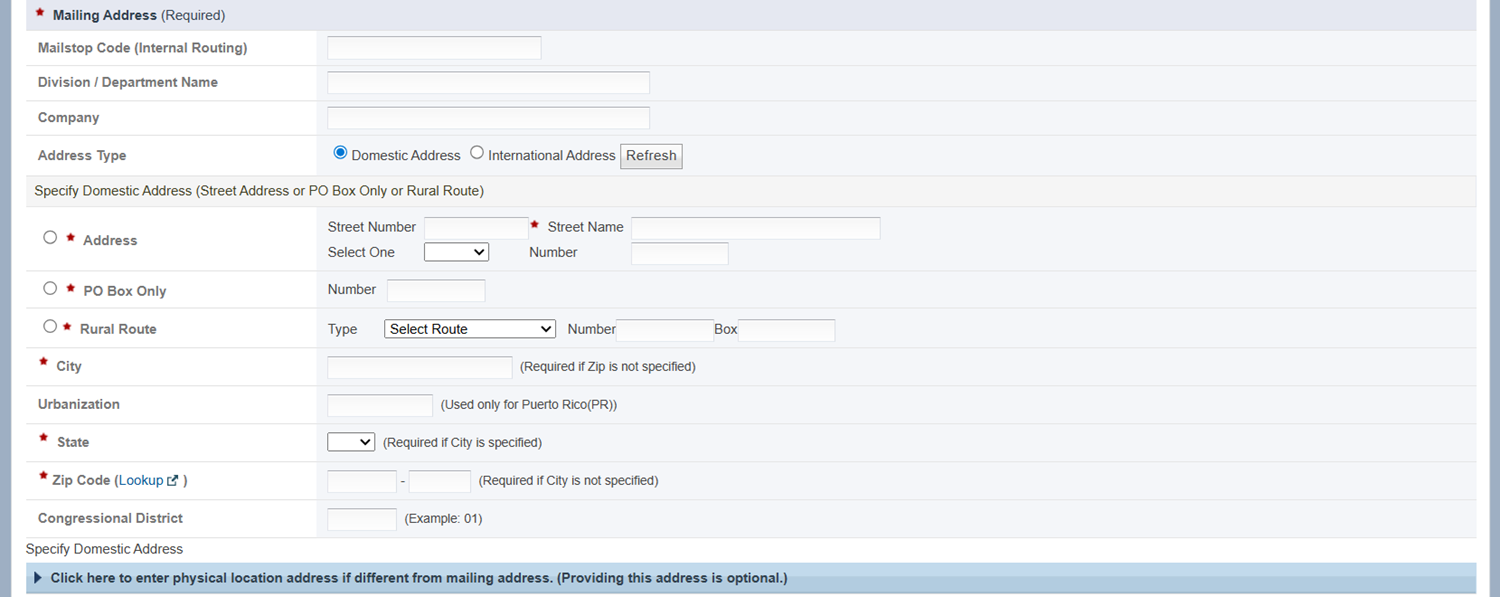
Figure 7. Create Account – Mailing Address
Required Fields
Element | Description |
Mailing Address (Required) | Enter a mailing address. (Figure 8) To do so, click the radio button to select one of the following: · Address · PO Box Only · Rural Route To enter an Address: · In the Street Number field, enter the number of the street only. · Enter the Street Name only, not the number. · If applicable, in the Select One dropdown, select one of the following options: APT, BSMT, BLDG, DEPT, FL, FRNT, HNGR, KEY, LBBY, LOT, LOWR, OFC, #, PH, PIER, REAR, RM, SIDE, SLIP, SPC, STOP, STE, TRLR, UNIT, or UPPR.: · Enter the Number which corresponds to the item you selected in the dropdown, if applicable. For example, APT 3, BLDG 5A, etc. To enter a PO Box Only: · Enter the Box Number if you selected PO Box. To enter a Rural Route: · In the Select One dropdown, select one the following options: Rural Route, Highway Contract Route, US Route, State Route, or Road. · Enter the route number, in the Number Field. · If applicable, enter the box number in the Box field. |
City | Enter the city in which the address is located. (Figure 8) NOTE: This field is only required if the “Zip Code” field is left blank. |
State | Use the State dropdown to select the state in which the address is located. (Figure 8) NOTE: This field is only required if the “City” field is completed. |
Zip Code | Enter the zip code in which the address is located. If necessary, use the Lookup link to help determine the appropriate zip code of the address. (Figure 8) NOTE: This field is only required if the “City” field is not completed. |
3.1.5 Physical Address
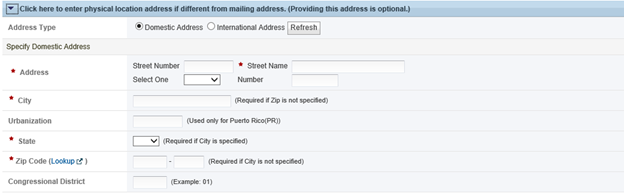
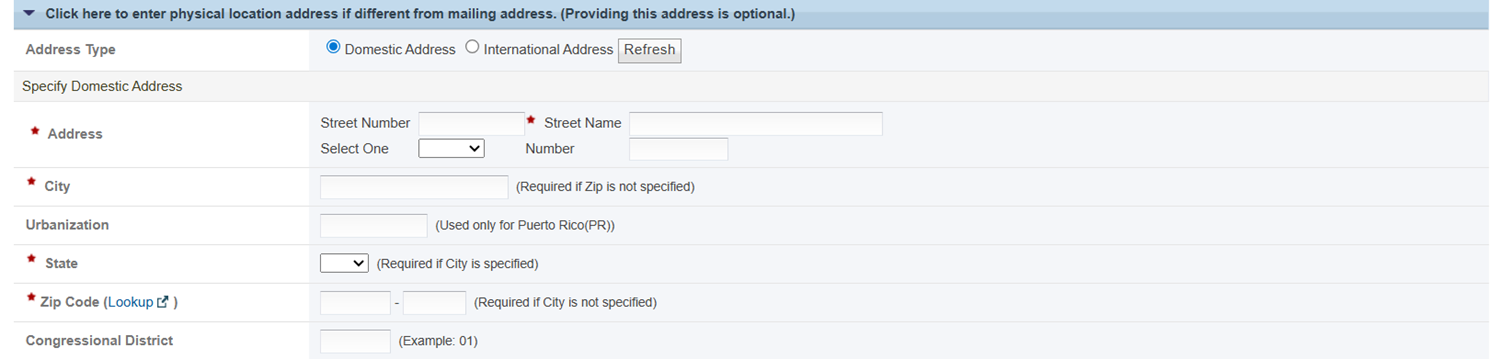
Figure 98. Create Account – Physical Address
|

...
| The |
...
| Physical Address |
...
| section is optional |
...
| ; however, if you |
...
| choose to enter information in this section, some fields will become required. Refer to section 3.1.4 Mailing Address for guidance on completing the fields. |
3.1.6 Degree Information
1. Choose the appropriate radio button from the options provided. (Figure 9)
2. Click the Add Degree button above the grid. PAMS will reload the page with editable fields in the grid.
3. Click the Degree dropdown and select the appropriate degree type. If the degree you wish to add is not listed in the dropdown, you may specify another type in the (If other, please specify) field below the dropdown.
4. Enter the field of study for the degree in the Field of Study field.
5. Enter the year in which the degree was awarded in the Award Year field.
6. Enter the institution at which the degree was completed in the Institution field.
7. When you are ready to add the degree, click Add. PAMS will reload the page with the degree listed in the grid.

Figure 9. Create Account - Degree information
3.1.7 Completing Account Creation
1 sections some fields may be required. You also have the option to enter a Physical International Address in this section as well.13. Once you have completed the required fields, click Create Account in the bottom right corner of the page. (Figure 89)
142. PAMS will navigate you to the Agreement page. Review the Notice to Users, Privacy Notice, and Rules of Behavior carefully. If you agree, click Accept in the bottom right corner of the page to proceed. If you disagree, click Decline in the bottom left corner of the page. You will not be able to Log into PAMS until you have signed the User Agreement. (Figure 10)
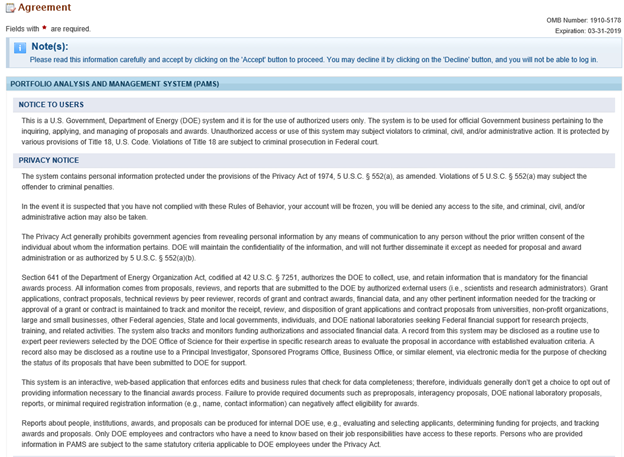
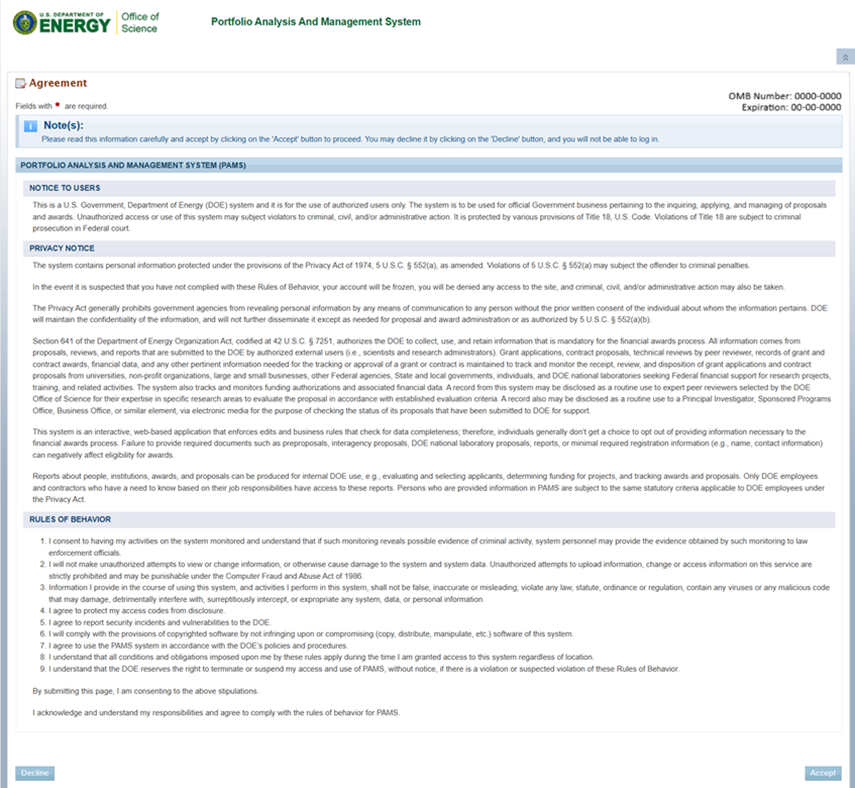
Figure 10. Agreement
153. Upon accepting the User Agreement you will be navigated back , PAMS will navigate to the Login page where you can enter your new created Username and Password and click Login to proceed into PAMS. (Figure 11)
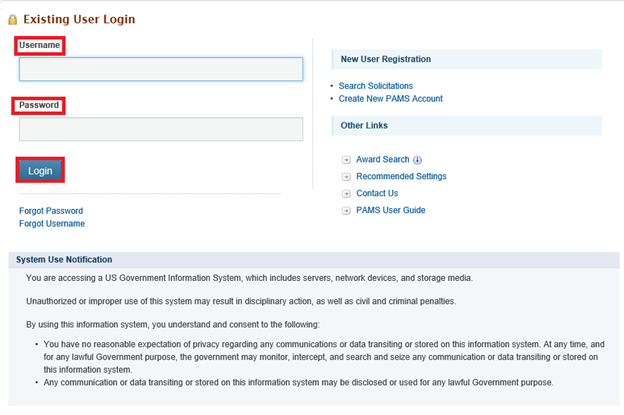
Figure 11. PAMS Login PageView/Update Profile page. Refer to section 4 Updating a User Profile for guidance on updating your profile.
3.2 Creating an External Account With a Registration Code
In some cases, an existing PAMS user may assign an unregistered user to a Proposal or Presubmission in PAMS. PAMS will send an email to the unregistered user notifying them that they have been assigned to a resource in PAMS and provide a login link and registration code to create an account.
Use the following steps to create an external PAMS account with a registration code.
1. Click the I do not have a PAMS account link in the email. (Figure 11)
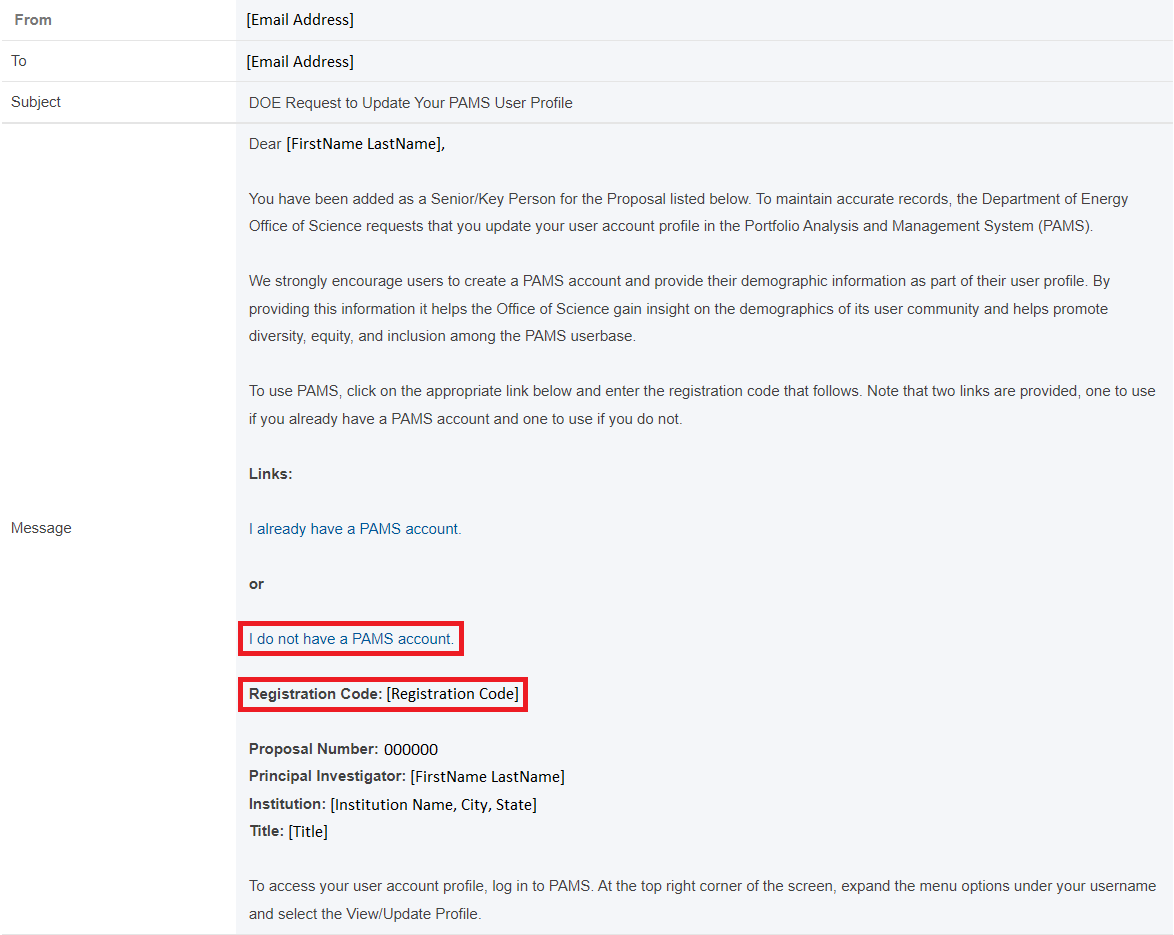
Figure 11. DOE Request to Update Your PAMS User Profile, Registration Code
(Figure 11)
Figure 11. DOE Request to Update Your PAMS User Profile, Registration Code
To enter a registration code, you must first create a PAMS account. Refer to section 3.1 Creating an External Account Without a Registration Code and its subsections for guidance on creating a PAMS user account. Once you have acknowledged the Agreement, proceed to the steps below.
1. After acknowledging the Agreement, PAMS will navigate to the Register to Institution page. For guidance on registering to an institution, refer to WIKI: Register to an Institution. Otherwise, click the Homepage icon in the top navigation bar. (Figure 12)
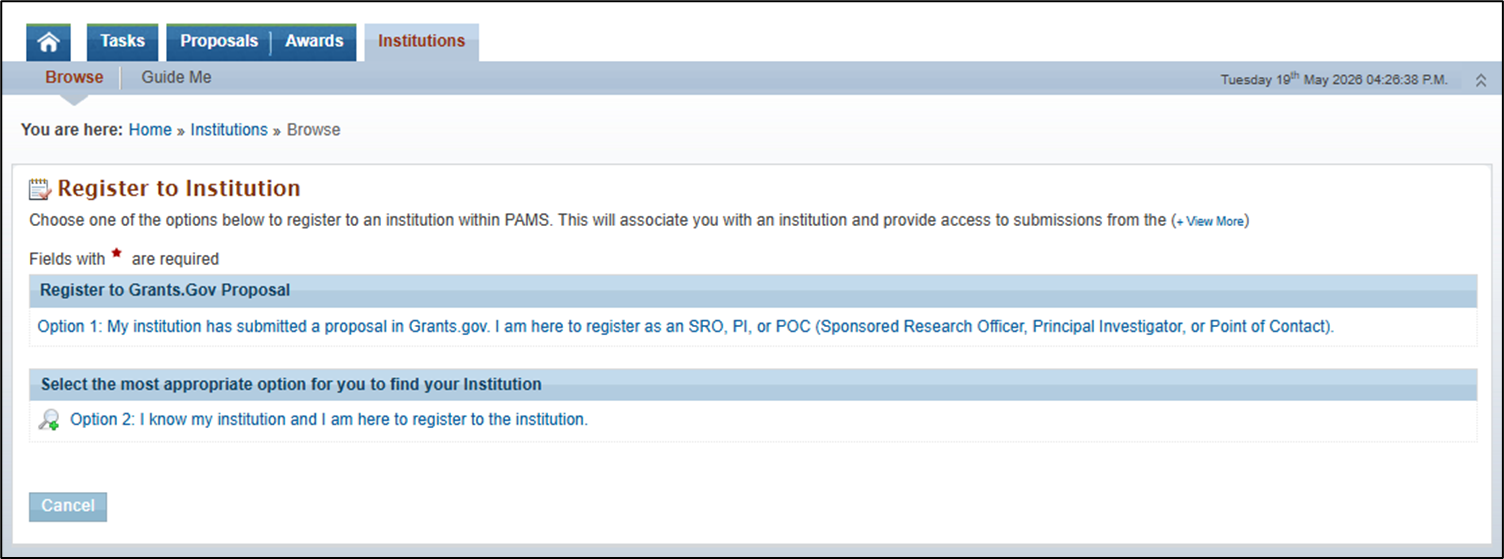
Figure 12. Register to Institution
2. Click the Input Registration Code link under "For All Users" in the "Common Activities" section. (Figure 13)
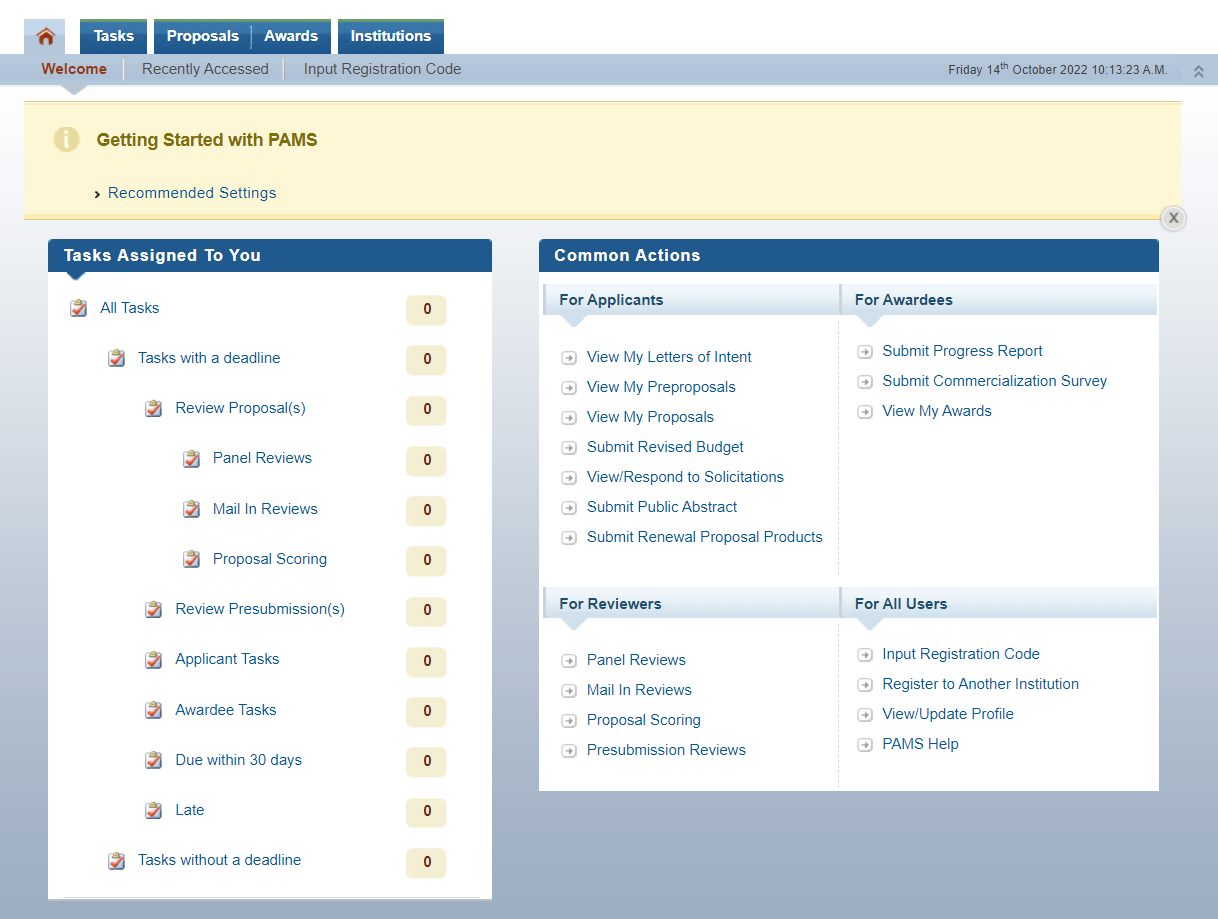
Figure 13. PAMS Homepage, Input Registration Code
3. PAMS will navigate 2. The link will navigate you to the Verify Registration Code page in PAMS. Enter the registration code located below the I do not have a PAMS account link in the email, and click Verify in the bottom right corner of the page. (Figure 12)
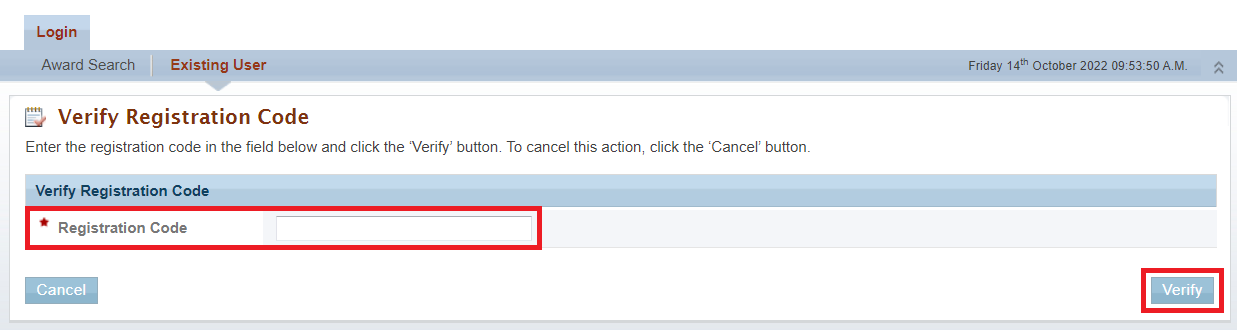
Figure 12. Verify Registration Code
verification code provided in the email and click the Verify button.
4. PAMS will navigate to the task or resource assigned to you in the email.
4 Updating a User Profile
Once you have created an account, you can update your profile at any time. Use the following steps to update your user profile.
1. From any page in PAMS, click View/Update Profile in the context menu under your username in the top right corner of the screen. (Figure 14)

Figure 14. PAMS Homepage, View/Update Profile
23. PAMS will navigate to the Create Account page. Refer to section 3.1 Creating an External Account Without a Registration Code, steps 5-14.View/Update Profile page, which consists of three tabs: Profile Information, Background Information, Resume/CV
Refer to the tables below for guidance on completing the required fields in each section.
4.1 Profile Information
For guidance on completing the fields in the Profile Information section, refer to the following sections above:
- 1.1 Personal Information
- 1.2 Individual Information
- 1.3 Contact Information
- 1.4 Mailing Address
- 1.5 Physical Address
- 1.6 Degree Information
1. Once you have made any necessary updates, select Save and Continue in the Choose Action dropdown in the bottom right corner of the page, and click Go.
4.2 Background Information
The Background Information tab contains information on your specialties. Use the following steps to edit your background information. (Figure 15)
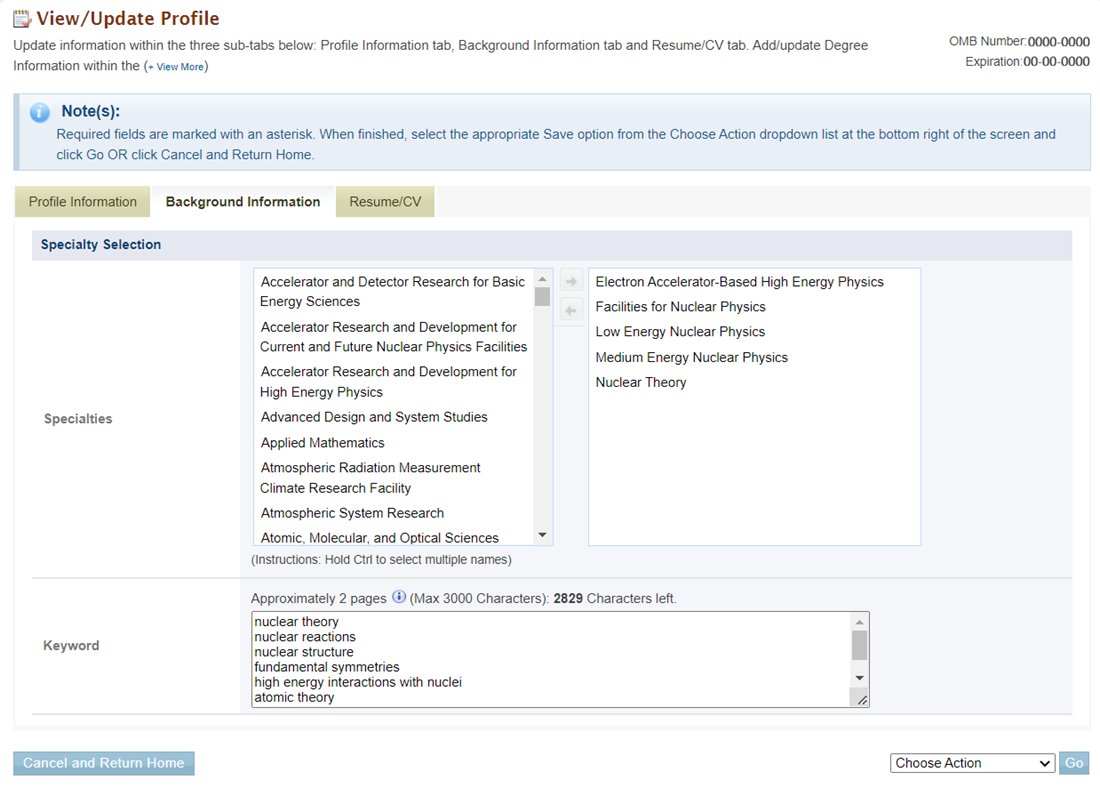
Figure 15. View/Update Profile, Background Information
1. Use the multi-select Specialties box to select one or more specialties.
2. Enter any keywords you would like associated with you in PAMS in the Keywords field.
3. Once you have made any necessary updates, select Save and Continue in the Choose Action dropdown in the bottom right corner of the page, and click Go.
4.3 Resume/CV
The Resume/CV tab contains your resume/CV. Use the following steps to manage your resume or CV.
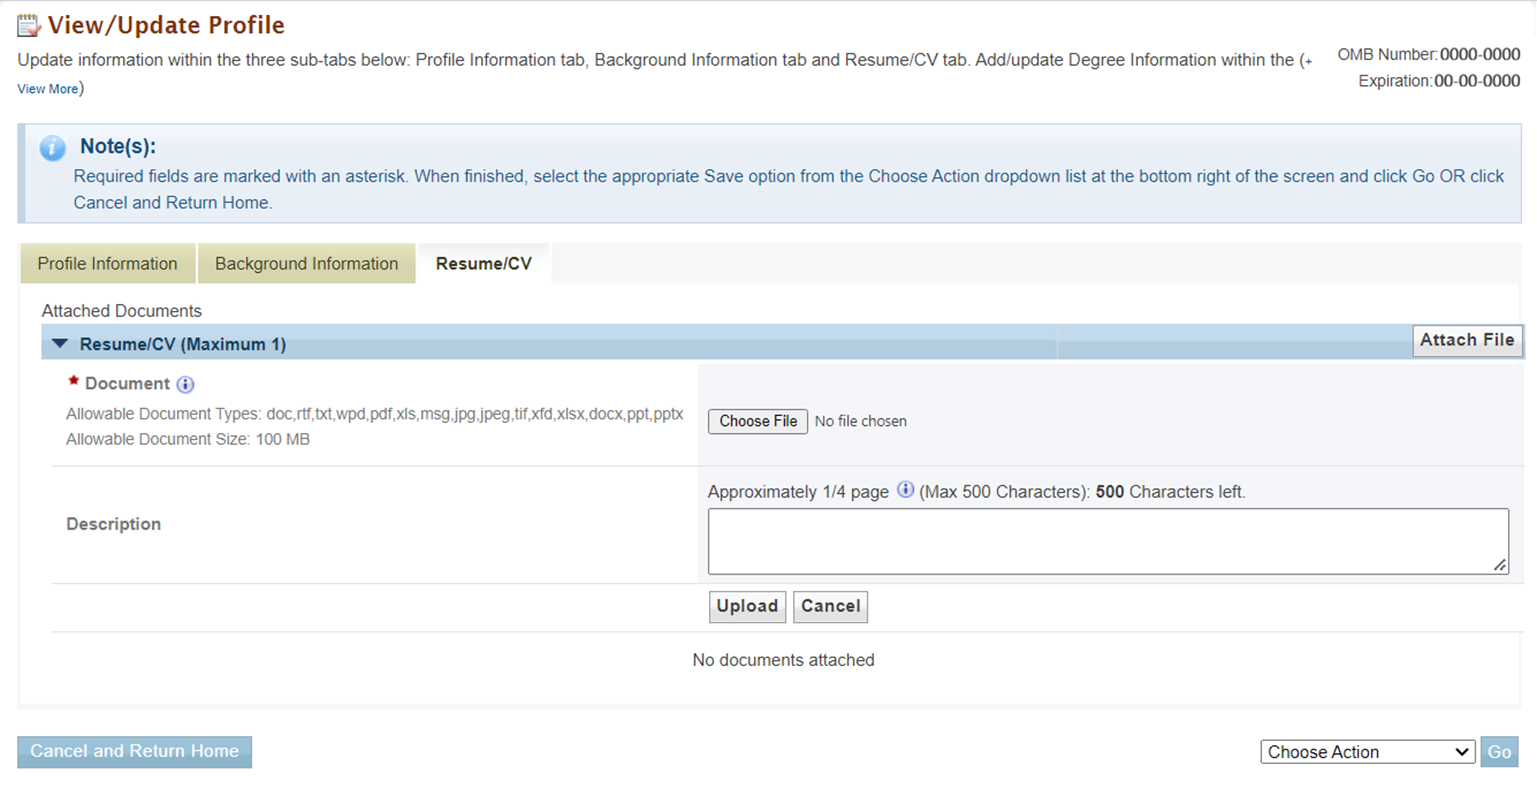
Figure 16. View/Update Profile, Resume/CV – Attach File
1. Click the Attach File button in the Resume/CV section header to expand the section and attach a resume or CV. (Figure 16) If there is already a file attached, click the Update Description context menu and choose Update Description to update the file description or Delete to delete the existing file and attach a new one. (Figure 17)
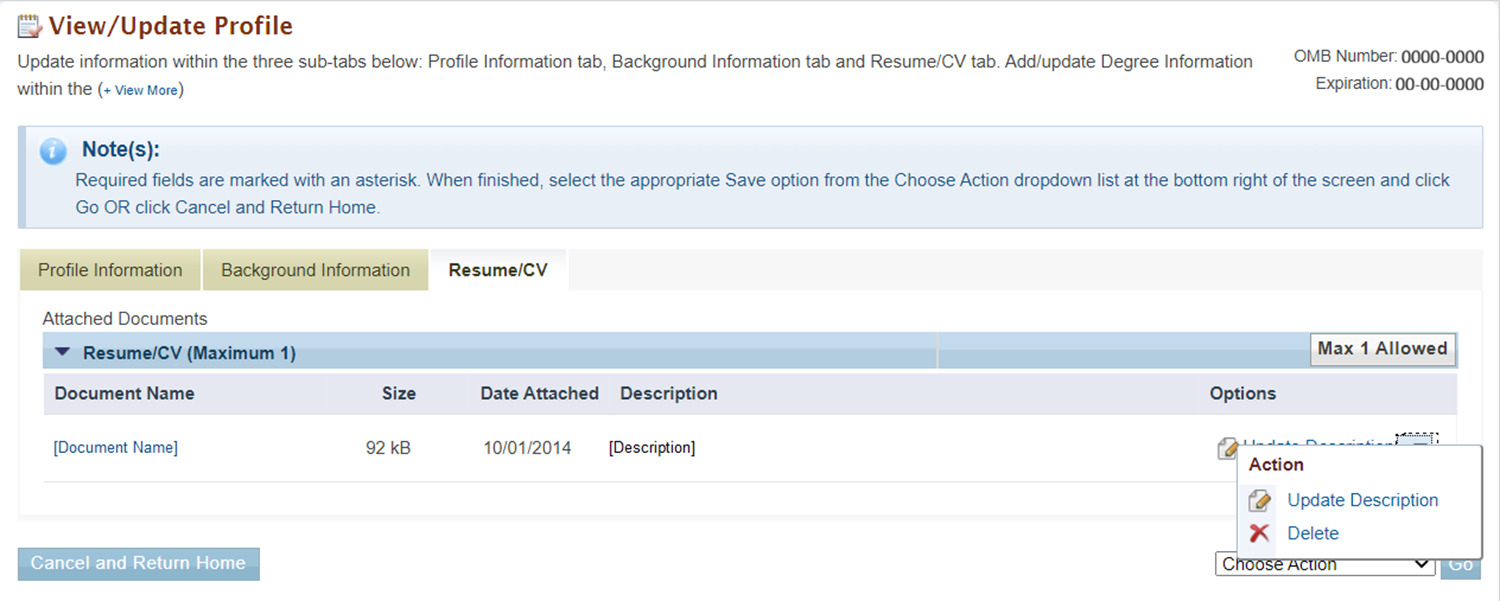
Figure 17. View/Update Profile, Resume/CV – Update Description
2. Once you have made any necessary updates, select Save and Return Home in the Choose Action dropdown 4. Upon clicking Accept in the bottom right corner of the Agreement page, and click Go. PAMS will navigate you return to the PAMS homepage. (Figure 13)Homepage.